

Transferring a domain’s registration into Amazon Route 53 means moving who manages your domain at the registry level, not just where your DNS records live, and that difference is what confuses most people when they first try to transfer domain to route 53. In practice, you deal with two systems at once—your current registrar and AWS—plus rules from the domain registry itself, which is why the process often feels harder than it should.
Learn more about: How to Classify Software Applications Components
TL;DR (Quick Summary)
- A domain transfer changes your registrar, not your web host or DNS records by itself.
- You must unlock the domain, disable privacy (often), and get an authorization code from your current registrar before you touch AWS.
- In Route 53, you start the transfer, enter contact details, choose name servers, and pay for one year of renewal.
- You approve the transfer via email or console, then wait 1–7 days while registrars and registries process it.
- Most failures come from domain locks, wrong auth codes, 60‑day transfer locks, and unreachable contact emails.
Why Is the Route 53 Domain Transfer Process So Particular?
Important rules and gotchas you need to know first
The biggest reason people struggle with this process is that registrar transfers follow strict ICANN and registry rules that AWS cannot override. For example, if your domain was registered or had its contact info changed in the last 60 days, many TLDs block transfers entirely, and Route 53 will simply report a failure with little detail. Based on experience, this 60‑day lock and registry‑level restrictions on some country-code TLDs (.uk, .de, etc.) are the most surprising constraints for new users.
Another confusing point is that DNS hosting and registration are separate services, even inside AWS. You can host DNS in Route 53 today and still keep the domain registered elsewhere, or you can move registration into AWS while keeping DNS hosted by a third party. According to industry standards, a registrar transfer should not break your website, but if you mishandle name servers during the move, you can still cause downtime.
Finally, country-code domains often behave differently from generic TLDs like .com or .net. Some ccTLD registries ignore owner-contact changes during transfer and keep the old registry data until you update it afterward in Route 53. That is normal behavior, but it often surprises people who expect all contact details to update automatically as part of the move.
What does “transfer domain to Route 53” actually change?
At a technical level, a transfer changes which registrar is listed in the WHOIS and registry database as responsible for the domain. Your DNS zone (the records that map names to IPs) can stay exactly the same if you keep using the same name servers. In practice, you will often consolidate DNS and registration in Route 53, but that is a separate configuration step from the transfer itself.
Industry best practice is to keep DNS stable during the move and only change name servers after the transfer completes and you verify everything works. This approach minimizes risk and avoids the classic scenario where email or a production site goes offline because NS records changed at the same time as the registrar. Thinking of the transfer and the DNS cutover as two distinct phases makes the whole process much easier to manage.
What Is the High-Level Process to Move a Domain into Route 53?
Step-by-step overview before you start
At a high level, moving registration to Route 53 involves four stages that you repeat for each domain. First, you prepare the domain at your current registrar: unlock it, disable transfer protection, confirm contact email addresses, and request the authorization code (also called EPP code). Without these prerequisites, Route 53 cannot even start the transfer, and your request will fail quickly.
Second, you use the Route 53 console to start the transfer request. You enter the domain name, the auth code, and choose whether Route 53 should use its own name servers or keep the current ones. Based on experience, leaving the existing name servers in place during the initial move is usually the safest choice, especially for production domains.
Third, you approve the transfer using email links or in‑console confirmations, depending on the TLD and registrar. This is a customer‑action step and often time‑sensitive; many links expire in 3–5 days. Finally, you wait while the registries and registrars process the request, which usually takes from a few minutes to up to 7 days, and you monitor the status in the Route 53 console.
Why a pre-transfer checklist matters so much
A structured pre‑transfer checklist prevents most failures and saves days of back‑and‑forth troubleshooting. According to experts, you should always verify: the domain is older than 60 days, not within a few days of expiration, unlocked, and using a contact email you can access immediately. You should also take a screenshot or export of your current DNS records before changing anything, in case you need to recreate them in Route 53 later.
In practice, teams that treat the checklist as optional often run into last‑minute surprises, such as domains auto‑renewing at the old registrar while the transfer is mid‑process. Another common real‑world example is losing access to approval emails because they go to an old IT mailbox that no one monitors anymore. Spending 10 minutes on preparation avoids most of these issues.
How Do You Actually Perform the Transfer in the Route 53 Console?
Step 1: Prepare the domain at your current registrar
To successfully start the move, you first fix everything that only your current registrar can change. Log in to their control panel and remove any transfer lock or “Registrar Lock” flag, which is usually a simple toggle. Then review the registrant and admin email addresses and update them to mailboxes you can access right now, because most confirmation messages go there.
Next, request the authorization (EPP) code, which some registrars display instantly and others email to you. Make sure you copy it exactly; based on experience, stray spaces or missing characters are a frequent cause of “invalid auth code” errors in Route 53. If your domain uses WHOIS privacy, check whether your registrar requires you to disable it temporarily so the contact emails are visible and routable.
Step 2: Start the transfer in the AWS console
Once you have the auth code, sign in to the AWS Management Console and open Route 53, then go to the “Registered domains” or “Transfer domain” section. Enter the domain name and let Route 53 check whether it supports that TLD and whether the domain appears eligible for transfer. If it is supported, you will be prompted to paste the authorization code and confirm your contact details.
You then choose whether to keep the current name servers or use Route 53’s name servers immediately. For most production scenarios, keeping the existing name servers during the move is safer, then migrating DNS records into a Route 53 hosted zone and updating NS records later. Finally, you review the estimated cost (typically a one‑year renewal), choose privacy options where supported, and submit the transfer request.
Step 3: Approve the transfer and monitor completion
After you submit, the registry and current registrar generate one or more confirmation emails that include an approval link. You must click these links and confirm the transfer within the specified window, often 3–5 days, or the request will time out. Some TLDs and registrars also let you approve or deny the transfer from their own control panel, which can speed up the process.
Once approvals are in place, the transfer usually completes automatically within 1–7 days, with .com and .net often finishing in under 24 hours. In the Route 53 console, you can track status messages such as “Pending transfer,” “In progress,” or “Completed.” If you see a failure status, the error text plus your registrar’s logs usually point to the exact rule that blocked the transfer, such as a 60‑day lock or incorrect code.
Learn more about: Google Domains Synthetic Records
What Are the Most Common Failure Points and How Do You Fix Them?
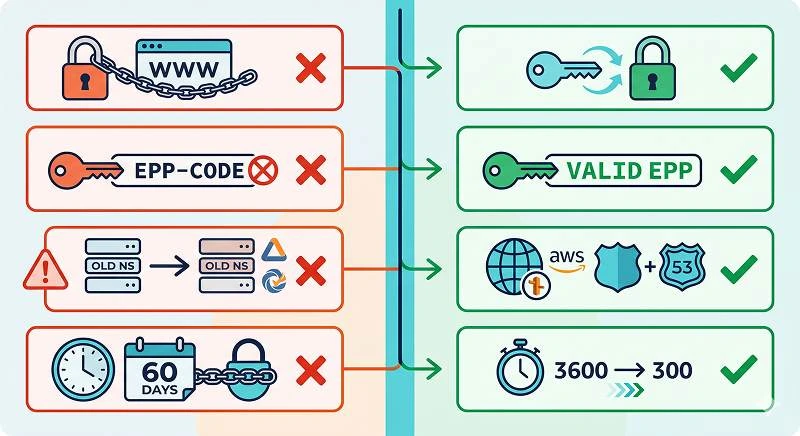
Typical reasons a Route 53 transfer fails
The most common reason a move fails is that the domain is still locked or under a 60‑day transfer restriction. When Route 53 submits the request, the losing registrar or the registry itself rejects it, and AWS surfaces only a generic failure message. The fix is to either unlock the domain properly or wait until the 60‑day period after registration or contact change has passed, then try again.
Another frequent issue is an invalid or expired authorization code. In practice, some registrars rotate EPP codes or invalidate them after a short time, so a code you copied last week may no longer work. Request a fresh code, double‑check for leading or trailing spaces, and resubmit the transfer request. Also verify that the domain is not in redemption or pending delete status; such domains usually cannot be transferred until restored.
Email problems are the third big category. If your contact email is wrong, disabled, or behind an aggressive spam filter, you may never see the approval link. According to industry standards, unapproved transfers simply time out, and you have to start over. Always whitelist AWS and registrar domains in your spam filter and verify that distribution lists or shared mailboxes are actively monitored during the transfer window.
How to avoid downtime or broken DNS during the move
From a reliability perspective, the biggest risk is not the registrar change itself but mismanaging DNS while everything is in flux. If you switch name servers at the same time you transfer registration, you stack multiple changes and make troubleshooting much harder if something goes wrong. A safer pattern is: first, transfer registration while keeping existing name servers; second, once complete, migrate DNS to a Route 53 hosted zone and update NS records with the registry.
Before any change, export or manually record all existing DNS records, including MX, TXT, and SRV records used by email and third‑party services. In real‑world incidents, teams often remember A and CNAME records but forget SPF or DKIM TXT records, leading to email failures after the move. If you must change name servers during the transfer, do it during a low‑traffic window and lower TTLs in advance so clients pick up new records quickly.
What Does It Cost, and Are There Limits or Special Cases?
Pricing behavior when moving domains into Route 53
When you move a domain into Route 53, AWS charges you for a one‑year renewal at the time you submit the transfer, and the registry extends your expiration date accordingly if the transfer completes. For example, if your .com domain expires in March 2025 and you transfer it in January 2025, the new expiration date will typically be March 2026. According to AWS pricing practices, the cost depends on the TLD, and premium domains or special country-code domains may carry higher fees.
If the transfer fails or is canceled before completion, Route 53 usually reverses or refunds the renewal charge, though the exact behavior can vary by payment method and timing. It is worth noting that you generally cannot use free-tier credits or promotional vouchers to pay for domain registration or transfer fees. Always review the Route 53 Domains pricing page for up‑to‑date per‑TLD costs before planning a bulk migration.
Quotas, limits, and registry-level constraints
By default, AWS sets a limit on how many domains you can register or manage per account, though for most small and medium organizations this limit is generous. If you plan to move hundreds or thousands of domains, you should open a support case in advance to raise the quota, rather than discovering the limit mid‑migration. Similarly, Route 53 hosted zones have limits on the number of records per zone, but these are high enough that typical business DNS setups rarely hit them.
Some TLDs impose special rules that affect the ability to transfer domain to route 53, such as requiring local presence, specific contact fields, or registry‑level approval. For instance, certain European country-code domains may require address validation or additional documentation before a registrar change. Based on experience, checking the TLD‑specific requirements in AWS documentation before you start avoids confusing failures that generic transfer guides do not explain.
How Can You Plan a Safe, Predictable Transfer to Route 53?
Practical migration strategy and risk management
A reliable strategy is to start with a low‑risk domain, such as a staging or internal domain, before you touch production. This gives you a chance to walk through the full process, including approvals, billing, and DNS handling, with minimal business impact. Once you are comfortable, you can schedule production moves during low‑traffic periods and communicate clearly with stakeholders about the expected timeline.
If you already host DNS in Route 53 and only need to move registration, the process is simpler: you just ensure that Route 53 name servers are already the ones at the registry before you initiate the transfer. In that scenario, the registrar change should be almost invisible to end users, because DNS answers continue to come from the same Route 53 hosted zone. Always verify name servers and test resolution with tools like dig or nslookup before and after the move.
Support, troubleshooting, and when to ask for help
If you hit issues you cannot explain, capture as much detail as possible: domain name, TLD, exact error messages, timestamps, and screenshots from both your current registrar and the AWS console. This information makes it much easier for AWS Support or your current registrar’s support team to identify whether the block is at the registrar or registry level. In many real‑world cases, the underlying cause is a registry rule that only the losing registrar can see in full.
AWS Support can help interpret Route 53 error messages, clarify TLD‑specific rules, and advise on safe DNS migration patterns, but they cannot override registry policies or force another registrar to release a domain. That limitation is true across the industry and not unique to AWS. If you plan a large‑scale migration, coordinating in advance with both AWS and your current registrar’s support teams is often the smoothest path.
In conclusion, when you transfer domain to route 53 successfully, you gain tighter integration with AWS services and centralized management, but you must respect registrar and registry rules at every step. By following a strict pre‑transfer checklist, handling DNS changes separately from the registrar move, and understanding common failure points, you can turn a confusing process into a