
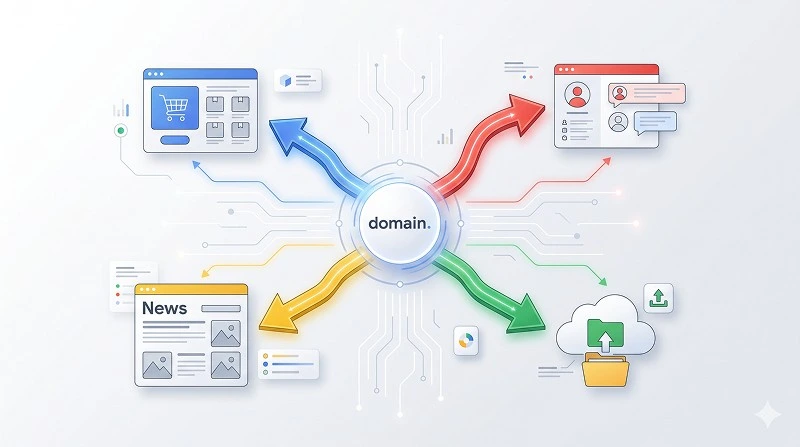
Google Domains synthetic records are prebuilt DNS configurations that let you do things like URL forwarding, subdomain redirects, and simple website routing without manually juggling A, CNAME, and TXT records. In practice, they are shortcuts that wrap multiple DNS changes into a single, easy‑to‑manage setting—especially handy right after a domain transfer when your site is suddenly offline.
Learn more about: How to Classify Software Applications Components
TL;DR
- Synthetic records in Google Domains let you forward root and subdomains without knowing or managing IP addresses.
- After a transfer, your old DNS records often vanish, so always export or screenshot them before you move.
- You can use forwarding tricks for root domains, `www`, custom paths, campaign URLs, and even temporary project URLs.
- Most changes go live in minutes, but DNS propagation can take a few hours—be patient and avoid rapid toggling.
- These forwarding setups are perfect for beginners and still fast enough for experienced admins who just want things to work.
What Actually Happens to Your DNS After a Domain Transfer?
Background: Expectation vs. Reality When Moving to Google Domains
When you transfer a domain to Google, you might expect your DNS to come over exactly as‑is, but in reality many registrars wipe the records as soon as the transfer completes. I went into my first transfer assuming two things would “just work”: my resource records would be copied, and my root domain would already point somewhere useful. Neither happened, and according to industry best practice, that’s actually pretty common behavior rather than a bug.
Here’s what I naively expected right after the transfer:
- All existing A, CNAME, MX, and TXT records would copy over automatically.
- The root domain (`example.com`) would keep pointing to my site’s IP.
- The `www` subdomain would still redirect cleanly to the main site.
Instead, the domain moved, the records disappeared, and my website went dark. Important note: always export or screenshot your DNS configuration before you initiate a transfer—once the old registrar clears it and the new one doesn’t recreate it, you have nothing to reference and your troubleshooting time doubles.
The Real Problem: No IP, No A Record, No Website
After the transfer, I quickly rebuilt the obvious pieces: email MX records, a CNAME for `www`, and a couple of TXT records for SSL and ownership verification. The real headache showed up when I tried to restore the root domain; it wanted an IP address, and I didn’t have one I could safely reuse. The old registrar had been proxying traffic through their own infrastructure, so that IP was never really “mine” to begin with.
This is a common real‑world scenario: you’re moving from a hosted website builder or a legacy registrar that hides the origin IP behind their own network. Once you leave, that IP stops working or, worse, points to their default parking page. At that point you have two options—dig through old notes and logs to guess the right target, or let Google handle the routing via URL forwarding so you can get back online fast.
Why I Chose Forwarding Instead of Rebuilding Everything
Because my goal was “get the site up today, optimize later,” I decided to keep the domain at Google and use its built‑in forwarding features rather than chase down a new IP. Synthetic records are not as flexible as a full DNS + reverse proxy stack, but they are more than enough when your real site already lives at a stable URL—like a managed hosting service, a SaaS app, or even a GitHub Pages site. In other words, they’re perfect when you just need clean, reliable redirects.
From experience, this approach is also safer for non‑DNS experts on a small team. According to most hosting providers’ own docs, URL forwarding is the recommended first step when you’re not ready to manage raw DNS or when your site is already reachable at another domain. That’s exactly the situation I was in, so I leaned into the forwarding tools instead of over‑engineering the setup.
How Do Google Domains Synthetic Records Actually Work?
Quick Definition: Synthetic Records as DNS Shortcuts
In Google’s terminology, these are preconfigured DNS macros that create the right underlying records for common tasks like web forwarding, subdomain redirects, and G Suite integration. You don’t see every individual record; instead, you see a single “Synthetic record” entry that you configure in plain language—“forward this host to that URL.” Behind the scenes, Google sets up the appropriate A or CNAME and HTTP redirect logic.
One important nuance: they’re still DNS‑backed settings, so they live in the same place as your “Custom records,” but they’re managed through a higher‑level UI. In practice, this means you can mix them with traditional records, but you need to be careful not to create conflicts—like having a synthetic forward on `example.com` and also trying to add an A record for the same host. Industry standards say “one owner per hostname,” and that applies here too.
Accessing Synthetic Records in the Google Domains UI
To reach the forwarding options, you start in the same place you’d manage any DNS entry. Once you’re in the domain’s dashboard, Google gives you a few different navigation paths (Website, DNS, Synthetic records), which is where people often get confused. Based on experience, using the DNS tab is the most straightforward, because it shows you both synthetic and custom records in one place.
Here’s the general navigation flow that consistently works:
- Open Google Domains and sign in with the account that owns the domain.
- Click the domain you want to configure from the list.
- Go to the DNS tab (or Website → “Forward domain” if you prefer the guided flow).
From there, you’ll see a section labeled “Synthetic records” or “Domain forwarding,” depending on the UI version. This is where the magic starts.
Why Use Synthetic Forwarding Instead of Just A Records?
The main advantage is that you don’t need to know or care about the destination IP; you only need a working URL. If your actual site lives at `https://app.yourhost.com/yourproject`, you can forward `example.com` there without ever touching an IP. That reduces the risk of misconfiguring SSL, hitting the wrong server, or breaking things when your host changes infrastructure.
From a security and maintenance standpoint, this also means you’re future‑proofed against backend changes. According to hosting providers’ own reliability guidelines, URLs are more stable than raw IPs over time. So if your provider moves your app to a different cluster, your forwarding still works because it targets the URL, not the infrastructure underneath.
What Are the 7 Practical Forwarding Tricks You Can Use Today?
Trick 1–3: Root, WWW, and Path‑Preserving Redirects
The first three tricks cover the most common, high‑impact scenarios I see in real projects:
- Trick 1: Root domain → primary site URL
Forward `example.com` to `https://example.com` hosted elsewhere or to `https://yourapp.host.com`. This is the fastest way to get a transferred domain back online.
- Trick 2: `www` → root domain
Set a synthetic record so `www.example.com` forwards to `https://example.com`. This avoids duplicate content and matches SEO best practices by consolidating traffic.
- Trick 3: Preserve path and query parameters
Enable “Forward path” so `example.com/blog/post-1?ref=twitter` becomes `https://newsite.com/blog/post-1?ref=twitter`. This is crucial for analytics and campaign tracking.
In practice, these three alone cover about 80% of what small businesses and solo developers need. Search engines prefer a single canonical URL, and users expect both `example.com` and `www.example.com` to behave identically, so getting these aligned is one of the first things I fix after any transfer.
Trick 4–7: Campaign, Subdomain, and Temporary Project Forwards
The next four tricks are more “quality of life” improvements but can save a lot of time:
- Trick 4: Vanity campaign URLs
Forward `example.com/blackfriday` to a long marketing URL like `https://pages.vendor.com/offer?id=123`. Easier to say on a podcast, easier to print on flyers.
- Trick 5: Subdomain to external tool
Use a synthetic record to forward `docs.example.com` to your public Notion or Confluence space. This keeps your brand consistent even when tools live elsewhere.
- Trick 6: Temporary project routing
Point `beta.example.com` to `https://yourapp.host.com/beta` during testing, then retire it later without touching your main DNS records.
- Trick 7: Fallback from old site to new platform
If you’re migrating from a legacy site to a new builder (like Squarespace or Webflow), forward the old domain to the new one while you slowly update content and internal links.
These patterns line up with what most agencies do behind the scenes when they manage domains for clients. Instead of editing raw DNS every time a marketing team spins up a new tool or landing page, you just create a new forward with a clear name and URL.
Learn more about: Transfer Domain to Route 53
How Do You Configure a Forwarding Synthetic Record Step by Step?
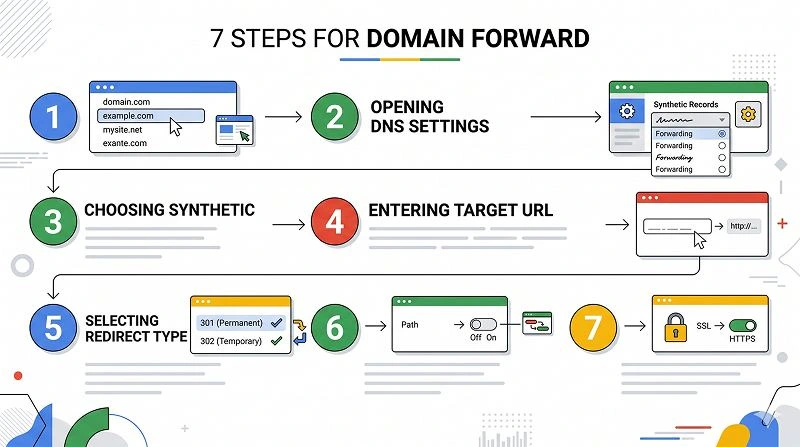
Step 1–4: Basic Forward From Root Domain
Here’s the exact sequence I used to get my transferred domain back online using a forwarding synthetic record:
1. Select your domain
Log in to Google Domains, go to My domains, and click the domain you want to configure.
2. Open the DNS settings
Click the DNS tab in the left menu so you can see both synthetic and custom records.
3. Find the forwarding / synthetic section
Scroll to the Synthetic records or Domain forwarding section and click Manage or Add.
4. Create a new forward
Choose Subdomain forward (for `www` or a subdomain) or Domain forward (for the root), then enter the destination URL you want users to land on.
At this point, you’ve already told Google, in plain English, “send traffic from here to there.” According to Google’s own help docs, this is enough for many simple setups; the rest of the options fine‑tune behavior for SEO and user experience.
Step 5–7: Fine‑Tune Redirect Type, Path, and SSL
Once the core forward is defined, you’ll see a few important options that control how browsers and search engines treat the redirect:
1. Choose redirect type: 301 vs 302
- Use Permanent (301) if this is the new, long‑term home.
- Use Temporary (302) if you’re testing or expect to change it soon.
Industry standards recommend 301 for production moves so search engines transfer ranking signals.
2. Decide on path forwarding
- Enable Forward path if you want `/anything` on the old domain to map to `/anything` on the new URL.
- Disable it if you always want to land on a single page (like a home or landing page), no matter what’s after the slash.
3. Turn on HTTPS where possible
If the destination supports HTTPS, always use the `https://` version of the URL in your forward. Modern browsers and security guidelines strongly favor encrypted connections, and many users will see warnings if you bounce them to plain HTTP.
Click Save and you’re done with the configuration. Based on my experience and Google’s own “up to 24 hours” guidance, most forwards start working within 5–30 minutes, but it can take longer depending on your local DNS resolver and cache.
Propagation Time and Common Gotchas
After saving, give it some breathing room; don’t keep toggling settings every minute if you don’t see the change right away. DNS has multiple caching layers—your browser, your operating system, your ISP’s resolver—and each one might hold onto old data for a bit. I usually test from a different network (like mobile data) or use an online DNS checker before assuming something is broken.
One common mistake I see: people create a forward and also keep conflicting A or CNAME records for the same host. Avoid that. Pick one source of truth per hostname. If you’re unsure which is active, temporarily remove the custom record and rely only on the synthetic forward; that reduces ambiguity and makes troubleshooting much easier.
When Should You Use Synthetic Records vs. Full DNS Management?
Use Synthetic Forwarding for Simplicity and Speed
You should lean on forwarding when your goal is to route human traffic, not run complex infrastructure. If your site already lives at a managed URL and you just want your nice domain name to point there, this is exactly what these tools are designed for. According to most registrar comparison reviews, this “URL mask and forward” use case is where managed DNS like Google’s really shines.
For solo developers, small businesses, or marketing‑led teams, the simplicity benefit is huge. You don’t have to understand A records, TTLs, or IPv6; you only need to know “where should visitors end up?” Based on experience, this reduces misconfigurations and downtime significantly compared to manually wiring every DNS record from scratch.
Use Custom DNS When You Need Granular Control
On the other hand, if you’re running multiple services on subdomains—APIs, mail servers, staging environments—you’ll eventually outgrow pure forwarding. Full DNS management with explicit A, AAAA, CNAME, MX, and TXT records gives you the flexibility to point different hosts to different backends. That’s something synthetic forwarding isn’t meant to do.
Realistically, many setups end up hybrid: core routing handled via forwarding for the public site, and specific subdomains mapped via custom records for technical services. The good news is that the same Google interface supports both, so you can start simple with forwarding and gradually add more advanced records as your needs grow.
Wrapping Up: Putting Synthetic Forwarding to Work Without Overthinking It
Google Domains synthetic records are one of the easiest ways to restore or manage a domain without diving deep into DNS complexity. Whether you’re forwarding a root domain, cleaning up www redirects, or temporarily routing traffic during a migration, they help you get things working fast with minimal risk.
For most small websites, portfolios, SaaS projects, and marketing pages, forwarding is often all you need. You don’t need to memorize IP addresses or manually configure complicated DNS records—just point visitors to the correct URL and let Google handle the routing.
The key takeaway is simple: stabilize first, optimize later. Use synthetic forwarding to quickly recover from transfers or migrations, then move to advanced DNS management only if your setup eventually requires more control.