
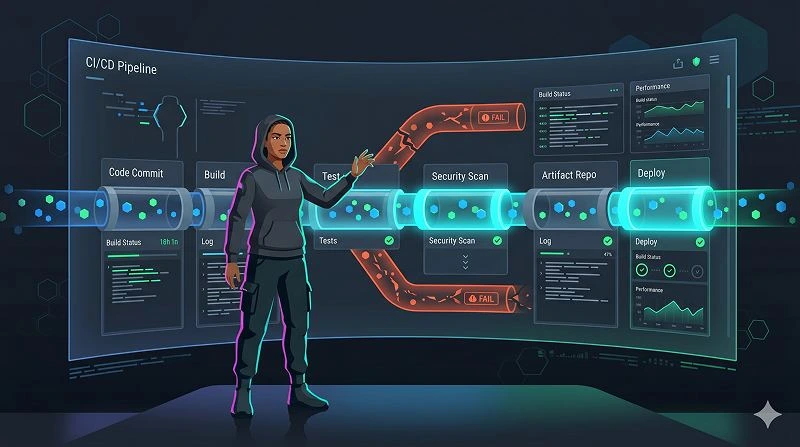
To inject environment variables to the build process reliably, you need a repeatable strategy that works across local builds, CI pipelines, and different runtime environments. In practice, the most stable approach is to centralize configuration, control when variables are loaded, and make them traceable for debugging and audits.
Learn more about: How to Classify Software Applications Components
TL;DR
- Use a layered model: base `.env` (or secrets store) + CI-level vars + job/pipeline-level overrides.
- Load variables explicitly at well-defined phases (before checkout, before build, before deploy).
- Store and export the final environment snapshot per build for traceability and debugging.
- Expose build causes and metadata as environment variables for better observability.
- Integrate with other plugins and tools instead of re-implementing secrets handling or masking.
What Is the EnvInject-Style Plugin and What Problem Does It Solve?
One-line intro and core capabilities
An EnvInject-style plugin for CI systems (for example, Jenkins or a similar internal platform) makes it possible to set up a controlled, reproducible environment for your builds by managing environment variables and setup scripts at multiple levels. Based on experience, this kind of plugin becomes essential once you have more than a handful of jobs and multiple agents with different OS or toolchains.
- Removes inherited environment variables from the CI master/agent process to enforce a clean baseline.
- Injects environment variables at node (controller/agent) startup so every build on that node shares consistent defaults.
- Executes initialization scripts before and after SCM checkout to prepare tools, credentials, or caches.
- Injects environment variables before SCM checkout, after SCM checkout, and as dedicated build steps.
- Securely injects sensitive values (passwords, tokens) without exposing them in logs or job configuration.
- Exports the resolved environment at the end of each build for inspection, debugging, and auditing.
According to industry best practices, the build environment should be explicit, versioned, and observable. This plugin enforces that by separating “what the OS gives you” from “what the build actually needs,” which reduces subtle bugs caused by different PATHs, Java versions, or leftover variables on shared agents.
Why this approach works better than ad-hoc scripts
From real-world usage, trying to manage all environment variables with ad-hoc shell snippets in every job quickly becomes unmaintainable. Variables drift, teams copy-paste outdated fragments, and security reviews become painful. Centralizing this logic in a dedicated plugin allows you to apply changes once at the controller or node level, while still letting individual jobs override or extend the environment in a controlled way.
What Are the Main Use Cases for Injecting Environment Variables?
Common CI/CD scenarios this plugin addresses
The primary use cases focus on making builds deterministic and easier to operate at scale. A common real-world example is standardizing PATH and tool locations across Linux and Windows agents so that the same pipeline script behaves identically everywhere.
- To remove inherited variables like `PATH`, `JAVA_HOME`, or `ANT_HOME` at node level and define your own clean baseline.
- To inject mandatory variables (proxy settings, artifact repository URLs, feature flags) before the first build step runs.
- To inject variables derived from user parameters, such as target environment (`ENV=staging`) or feature toggles.
- To run a setup script before SCM checkout that configures custom Git credentials or SSH keys.
- To run a teardown or post-checkout script that normalizes file permissions or fetches additional dependencies.
- To inject variables from a file that was generated by a previous build step (for example, dynamic version numbers).
- To capture and inspect the full set of variables used in a build when debugging environment-related failures.
- To expose the build cause (manual, timer, SCM change, upstream job) as environment variables for logging and routing.
- To export environment metadata into external systems like artifact repositories or observability tools.
In practice, these use cases show up in almost every mature CI/CD setup, especially when teams start sharing agents across dozens or hundreds of projects.
Benefits compared to manual environment management
According to experts, the main benefit is consistency: once you encode rules in the plugin configuration, every job that uses it behaves the same way. This reduces on-call noise from “works on my machine” issues and shortens the time to diagnose failures caused by missing or conflicting environment variables.
How Do You Configure Environment Injection at Different Levels?
At controller/agent (node) level
At the node level, you configure baseline environment variables and cleanup rules that apply to every job running on that node. In practice, this is where you standardize `PATH`, set global proxies, define default tool locations, and optionally strip away inherited variables from the CI service account.
Typical steps are:
- Open the node configuration in your CI UI and locate the “Environment variables” or “EnvInject” section.
- Optionally enable “Remove existing environment variables” to start from a clean slate.
- Define key/value pairs or point to a properties file, such as:
- `TOOLCHAIN_ROOT=/opt/toolchain`
- `MAVEN_HOME=/opt/maven-3.9.0`
- Save and reconnect the agent so new builds inherit the updated baseline.
This setup is especially useful when different agents host different toolchains (for example, Android SDK vs. iOS toolchain) and you want each pool to advertise its capabilities via environment variables.
At job level: clean env, pre/post-SCM, build-step injection
At the job level, you refine or override the baseline for a specific project or pipeline. Based on experience, this is where most teams implement project-specific configuration such as service endpoints, feature flags, or per-repo secrets.
Common patterns include:
- Set up a clean environment:
- Enable “Override node environment” and specify only the variables your job needs.
- Use this when you want to guarantee that no unexpected variable leaks in from the node.
- Inject variables after SCM checkout:
- Configure a “Post-SCM injection” step that reads a `.env` or `build.properties` file from the workspace.
- Useful when the repo itself owns part of the configuration (for example, microservice-specific flags).
- Inject variables as a build step:
- Add an “Inject environment variables” build step that points to a file generated by a previous step.
- Example: a script computes `VERSION` and `RELEASE_CHANNEL` and writes them to `env.properties`, which is then injected for the rest of the build.
This layered model allows you to keep global concerns at node level while delegating application-specific logic to job configuration and repository files.
Learn more about: The Twelve-Factor App Config Environment variables
How Can You Trace Variables and Expose Build Causes?
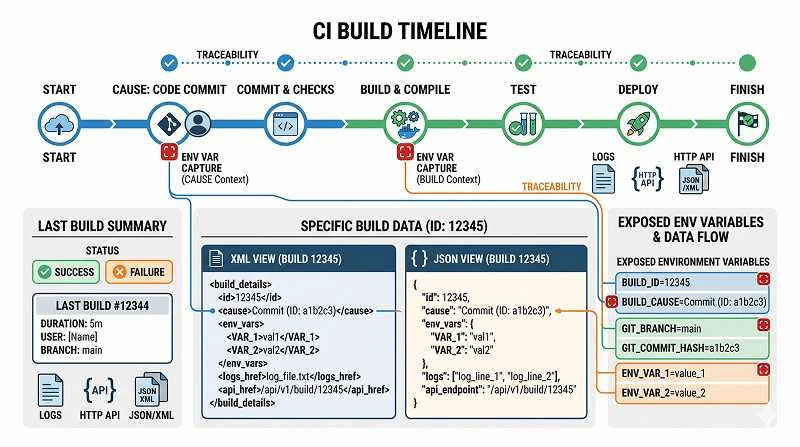
Variables traceability and HTTP API access
For each build, the plugin captures the resolved environment and writes it to a text file in the build directory. In a Jenkins-style layout, this looks like:
- File name: `injectedEnvVars.txt`
- Path pattern:
- `$JENKINS_HOME/jobs/
/builds/ /injectedEnvVars.txt`
From the UI, you typically access this via a link on the build page such as “Injected environment variables.” This is invaluable when you need to debug why a specific build behaved differently from another, because you can diff the environment snapshots.
You can also retrieve the environment via HTTP for automation or external analysis. A typical pattern is:
- Base URL:
- `
/job/ / /injectedEnvVars/export`
Supported formats usually include plain text, XML, and JSON. Example `curl` commands:
“`bash
Last build, plain text
curl -X GET -H “Accept: text/plain” \
“
Specific build, XML
curl -X GET -H “Accept: application/xml” \
“
Specific build, JSON
curl -X GET -H “Accept: application/json” \
“
“`
According to audit and compliance standards, having this immutable record per build is a strong advantage when you must prove how a binary was produced.
Build causes as environment variables
The plugin can also expose the build cause as one or more environment variables. In practice, a build might be triggered manually, by a timer, by SCM changes, or by another upstream job, and sometimes several triggers can apply at once.
A typical convention is:
- Aggregate cause list:
- `BUILD_CAUSE=SCMTRIGGER,TIMERTRIGGER`
- Individual booleans:
- `BUILD_CAUSE_MANUALTRIGGER=true`
- `BUILD_CAUSE_TIMERTRIGGER=false`
- `BUILD_CAUSE_SCMTRIGGER=true`
This information is extremely useful for routing logic in pipelines (for example, skip expensive integration tests on timer builds) and for observability (tagging metrics or logs by trigger type).
What Are Some Practical Examples and Integrations?
Example: Modifying PATH on Windows and Linux
A common need is to adjust `PATH` so builds use a specific version of a tool. According to experience, managing this centrally dramatically reduces “wrong JDK” or “wrong Maven” incidents.
On a Windows agent, node-level configuration might include:
“`properties
PATH=C:\tools\jdk-17\bin;C:\tools\maven-3.9.0\bin;%PATH%
JAVA_HOME=C:\tools\jdk-17
MAVEN_HOME=C:\tools\maven-3.9.0
“`
On a Linux agent, you might configure:
“`properties
PATH=/opt/jdk-17/bin:/opt/maven-3.9.0/bin:$PATH
JAVA_HOME=/opt/jdk-17
MAVEN_HOME=/opt/maven-3.9.0
“`
Then, at job level, you can further prepend language-specific toolchains (for example, Node.js or Go) without touching the global node configuration.
Example: Integrating with trigger or parameter plugins
In larger setups, this plugin often works alongside trigger plugins (for example, Gerrit, GitHub webhooks) and parameter plugins. A realistic flow is:
- A trigger plugin starts a build and passes branch, change ID, or PR number as parameters.
- The environment-injection plugin maps these parameters to environment variables such as `GERRIT_CHANGE_ID` or `GITHUB_PR_NUMBER`.
- The build scripts or pipeline stages consume these variables to decide which tests to run or where to deploy.
If a parameter changes format (for example, from numeric ID to full URL), you only adjust the mapping in one place instead of updating every job script.
How Does This Compare to Other Approaches and What Are the Limitations?
Additional features provided and extensibility with other plugins
Other plugins can extend this capability by contributing additional environment variables via extension points. For example, a “Shared Objects” plugin might populate shared configuration objects and expose them as environment variables or JSON blobs.
Typical patterns include:
- The environment-injection plugin captures variables from extension points implemented by credentials, SCM, or cloud plugins.
- Those variables become available to triggers, build steps, and post-build actions.
- Observability or “build context capture” plugins can then read `injectedEnvVars.txt` and ship it to log storage or trace systems.
This composability is a major reason why CI ecosystems standardize on a small number of environment-related extension points instead of every plugin inventing its own mechanism.
Comparison with native CI features and older plugins
Most CI systems provide basic environment variable support at job or pipeline level, but they often lack multi-phase injection (pre-SCM vs. post-SCM), environment cleanup, and per-build traceability. Older plugins or ad-hoc scripts may offer partial solutions but are frequently deprecated or hard to maintain.
According to community discussions, a dedicated plugin that handles both node-level and job-level configuration is a more robust alternative because:
- It can automatically migrate legacy job configuration from older environment plugins.
- It manages both controller and agent environments consistently.
- It exposes a stable API and file format that other tools can rely on.
When you decide to inject environment variables to the build process this way, you gain a single source of truth instead of scattering environment logic across fragile scripts.
Known limitations and pipeline/security considerations
There are some important limitations to acknowledge, especially around modern pipeline features and security plugins. While you can often configure environment injection in pipeline jobs, behavior may differ from classic freestyle jobs because pipelines control their own environment scopes.
Typical caveats include:
- Some advanced use cases (for example, mid-pipeline re-injection) may not work as expected in declarative or scripted pipelines.
- Only specific fields or steps (such as a dedicated “environment” block) are fully supported; other patterns can behave inconsistently.
- Issue trackers often reference this with tickets like `ISSUE-12345`, and maintainers may not plan short-term changes without community contributions.
For security, password-masking plugins can usually hide sensitive values in logs, but the environment-injection plugin avoids a hard dependency on any specific security plugin. This means:
- Secrets should still be stored in a proper credentials or secrets-management plugin.
- The environment plugin only handles secure injection, not storage or masking policy.
- You should validate that masked values never appear in `injectedEnvVars.txt` if your compliance rules require that.
Conclusion: What Finally Worked for Reliable Environment Injection?
Actionable approach you can apply today
The approach that consistently works in real projects is to treat the environment as a first-class, versioned artifact of your build, rather than as an afterthought. Use the plugin to define a clean baseline at node level, then refine it per job or pipeline stage, and always export the final environment for traceability.
In practice, the most effective pattern is:
- Centralize shared configuration and secrets in dedicated services or files.
- Use the environment-injection plugin to pull those values in at predictable times
Learn more about: User Registration Success Message